
Tools
No tools specified.
Parts
-
-
The Brickstuff Single Function Lighting Effect Controller (LEC) is a small circuit board pre-programmed with 12 lighting effects that works with the full line of Brickstuff lighting products.
-
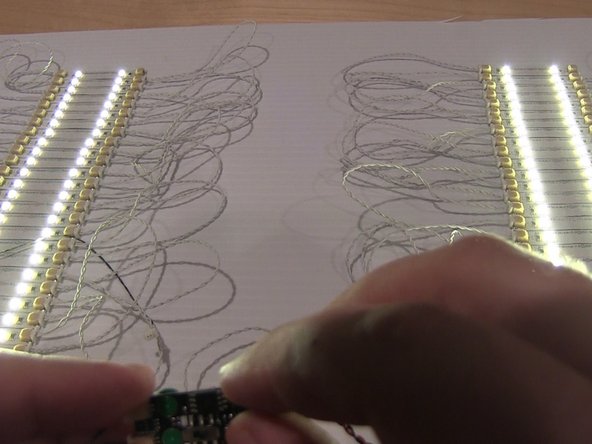
Although they are small, each LEC is capable of driving 100 LEDs or more, so you can use them with your largest installations.
-
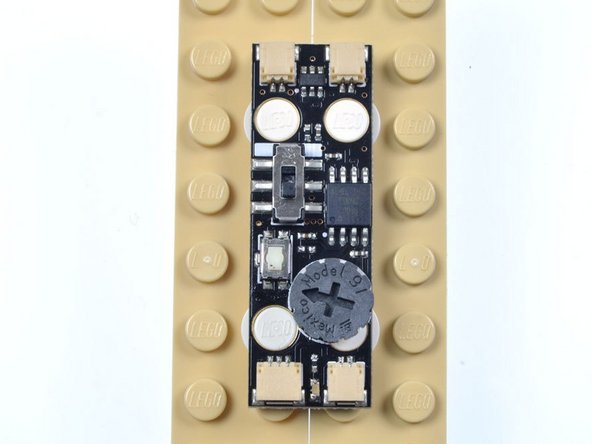
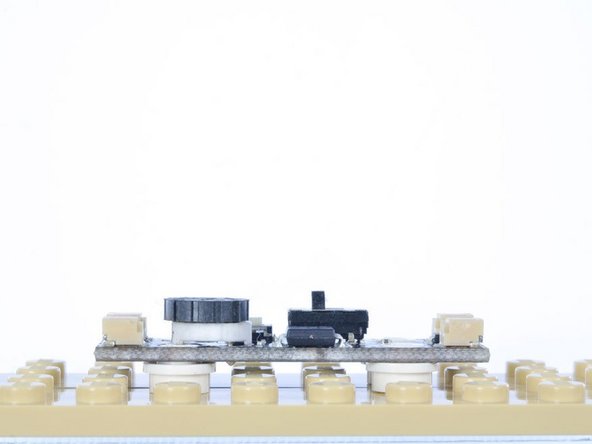
Each LEC has two output channels, four holes for mounting to LEGO studs, an adjustment wheel, two power inputs, a mode selector switch, and an on/off switch for controlling the random effect.
-
LECs can be mounted directly to LEGO elements using four 1x1 round plates.
-
-
-
The LEC is a sensitive piece of electronic equipment. It is designed for indoor use only, and must be kept dry at all times.
-
When connecting cables to the LEC, carefully observe the number of positions in each connector. Some LEC kits ship with a 3-position power connector, while others ship with a 2-position connector. The LEC has both 3-position and 2-position power inputs-- do not plug a 2-position connector into a 3-position plug.
-
Each plug will fit into a connector one way only. The top of Brickstuff plugs are solid white, while the bottoms have connectors visible. Plugs should only be inserted with the top side up. DO NOT FORCE PLUGS.
-
-
-
Make sure plugs are inserted with the correct side up.
-
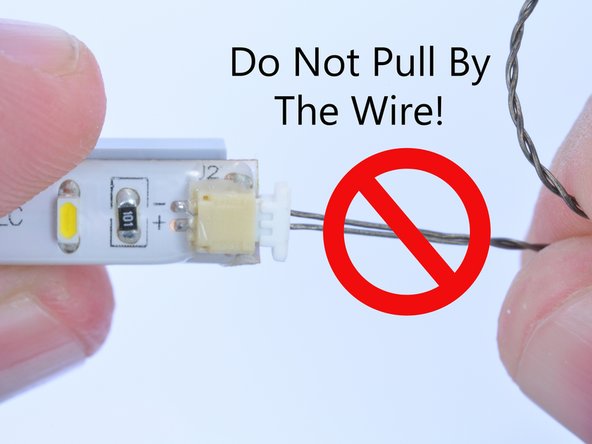
When removing plugs, do not pull by the wire. Doing do will damage the plug and may cause the wires to pull out of the plug assembly.
-
The proper way to remove a plug is to pinch the plug tabs at both the top and bottom, then pull out while gripping the plug itself.
-
-
-
Each single-function LEC has 12 pre-programmed lighting effects. The next 12 steps of this guide will demonstrate each effect in detail.
-
The video associated with this step shows the first effect: on/off with dimming. This is the default effect when LECs ship from the factory.
-
Use this effect when you want to control the brightness of your lights directly. Brightness can be set using the thumbwheel control on the LEC.
-
You can also use this effect to implement random on/off switching on two independent channels. To activate this mode, turn the on/off switch on the LEC to the top position. This will make each channel cycle through on and off states at random intervals.
-
Once set, you can control the speed at which the channels transition from off to on by turning the thumbwheel (you will see the effect each time the lights come on or turn off).
-
You can also set the average on/off duration from anywhere between 1 and 30 minutes. See step 17 for information on how to set this.
-
-
-
The second lighting effect programmed into the LEC is a flickering flame effect. With this effect, the two output channels flicker independently. You can mount a single light in a lantern, or put both channels into a fireplace for a rich effect.
-
You can vary the intensity of the flickering effect with the thumbwheel.
-
You can also use this effect to implement random on/off switching. To activate this mode, turn the on/off switch on the LEC to the top position. This will make the effect (both channels) cycle through on and off states at random intervals.
-
You can also set the average on/off duration from anywhere between 1 and 30 minutes. See step 17 for information on how to set this.
-
-
-
The third lighting effect programmed into the LEC is a pulse effect. With this effect, the two output channels pulse back and forth.
-
You can vary the speed of the pulsating effect with the thumbwheel.
-
You can also use this effect to implement random on/off switching. To activate this mode, turn the on/off switch on the LEC to the top position. This will make the effect (both channels) cycle through on and off states at random intervals.
-
You can also set the average on/off duration from anywhere between 1 and 30 minutes. See step 17 for information on how to set this.
-
-
-
The fourth lighting effect programmed into the LEC is a glimmer effect. With this effect, the two output channels fade on and off at random speeds. Each time a channel fades to off, a new speed is randomly selected, so the effect also changes over time as it runs.
-
You can vary the overall speed of the glimmer effect with the thumbwheel.
-
You can also use this effect to implement random on/off switching. To activate this mode, turn the on/off switch on the LEC to the top position. This will make the effect (both channels) cycle through on and off states at random intervals.
-
You can also set the average on/off duration from anywhere between 1 and 30 minutes. See step 17 for information on how to set this.
-
-
-
The fifth lighting effect programmed into the LEC is a jet or rocket engine effect. With this effect, the two output channels pulse on and off together.
-
You can also use this effect to implement random on/off switching. To activate this mode, turn the on/off switch on the LEC to the top position. This will make the effect (both channels) cycle through on and off states at random intervals.
-
You can vary the intensity of the engine/rocket effect with the thumbwheel.
-
When set to random on/off mode, this effect will create a "revving" effect when transitioning to the on state, and a "sputtering" effect will occur when transitioning to the off state. These added effects are unique to this effect mode.
-
You can also set the average on/off duration from anywhere between 1 and 30 minutes. See step 17 for information on how to set this.
-
-
-
The sixth lighting effect programmed into the LEC is a flashing effect designed to replicate the style of flashing used by airport runway lights.
-
You can vary the speed of the flashing effect with the thumbwheel.
-
You can also use this effect to implement random on/off switching. To activate this mode, turn the on/off switch on the LEC to the top position. This will make the effect (both channels) cycle through on and off states at random intervals.
-
You can also set the average on/off duration from anywhere between 1 and 30 minutes. See step 17 for information on how to set this.
-
-
-
The seventh lighting effect programmed into the LEC is a flash effect. With this effect, the two output channels flash back and forth.
-
You can vary the speed of the flashing effect with the thumbwheel.
-
You can also use this effect to implement random on/off switching. To activate this mode, turn the on/off switch on the LEC to the top position. This will make the effect (both channels) cycle through on and off states at random intervals.
-
You can also set the average on/off duration from anywhere between 1 and 30 minutes. See step 17 for information on how to set this.
-
-
-
The eighth lighting effect programmed into the LEC is a single strobe effect.
-
You can vary the speed of the strobe effect with the thumbwheel.
-
You can also use this effect to implement random on/off switching. To activate this mode, turn the on/off switch on the LEC to the top position. This will make the effect (both channels) cycle through on and off states at random intervals.
-
You can also set the average on/off duration from anywhere between 1 and 30 minutes. See step 17 for information on how to set this.
-
-
-
The ninth lighting effect programmed into the LEC is a double strobe effect.
-
You can vary the speed of the strobe effect with the thumbwheel.
-
You can also use this effect to implement random on/off switching. To activate this mode, turn the on/off switch on the LEC to the top position. This will make the effect (both channels) cycle through on and off states at random intervals.
-
You can also set the average on/off duration from anywhere between 1 and 30 minutes. See step 17 for information on how to set this.
-
-
-
The tenth lighting effect programmed into the LEC is an effect we call "blinkylights." In this effect, each channel flashes on and off at random intervals. This is a great effect to use when you want to recreate a space ship's computers.
-
You can vary the speed of the blinkylights effect with the thumbwheel.
-
You can also use this effect to implement random on/off switching. To activate this mode, turn the on/off switch on the LEC to the top position. This will make the effect (both channels) cycle through on and off states at random intervals.
-
You can also set the average on/off duration from anywhere between 1 and 30 minutes. See step 17 for information on how to set this.
-
-
-
The eleventh lighting effect programmed into the LEC is a laser cannon effect. With this effect, the output channels fire in sequence, and there is a random pause between firing sequences.
-
You can vary the length of the random pause between sequences using the thumbwheel.
-
The random on/off switching effect does not apply to this mode. Turning the on/off switch on the LEC to the top ("on") position will have no impact on this effect.
-
-
-
The twelfth and final effect programmed into the LEC is a Cannon with Explosion. In this effect, one channel acts as the cannon (firing at random intervals), and the other channel explodes following the firing of the cannon. The explosion flickers like a burning fire, slowly burning out over time.
-
When the fire burns out, the cycle repeats after a random pause interval. You can control the random duration of the pause using the thumbwheel.
-
The random on/off switching effect does not apply to this mode. Turning the on/off switch on the LEC to the top ("on") position will have no impact on this effect.
-
-
-
The LEC ships from the factory with effect brightness set to maximum, but you can change the maximum brightness level for all effects using the thumbwheel.
-
To change the maximum brightness setting, make sure the random on/off switch is in the OFF (down) position.
-
To enter LEC programming mode, hold down the mode button for at least three seconds. Any lights connected to the LEC will flash three times to confirm you have entered programming mode.
-
Once in programming mode, adjust the maximum brightness using the thumbwheel. Any lights connected to the LEC will adjust as you turn the wheel.
-
Once you have found your desired maximum brightness level, hold down the mode button again for at least three seconds. Any lights connected to the LEC will flash three times to confirm you have exited programming mode, and the LEC will return to running whatever lighting effect was active before you entered programming mode.
-
You may need to re-adjust the speed/intensity of the lighting effect after leaving programming mode (if you moved the thumbwheel while setting maximum brightness).
-
All lighting effects will now use the maximum brightness you set. The maximum brightness setting is preserved even when power to the LEC is removed.
-
-
-
The random on/off duration controls the average amount of time the lighting effects are on or off when the random on/off switch is set to "ON".
-
The LEC ships from the factory with the random on/off duration set to 30 minutes.
-
You can adjust the average on/off duration. To do this, make sure the random on/off switch is in the ON (up) position.
-
To enter LEC programming mode, hold down the mode button for at least three seconds. Any lights connected to the LEC will flash three times to confirm you have entered programming mode.
-
Adjust the random on/off interval with the thumbwheel. Any lights connected to the LEC will flash in a sequence of 1-10 blinks. Each blink equals three minutes of random on/off delay (30 minutes max). The sequence repeats to allow you to set your desired average delay.
-
Once you have found the desired average delay, hold down the mode button again for at least three seconds. Any lights connected to the LEC will flash three times to confirm you have exited programming mode, and the LEC will return to running whatever lighting effect was active before you entered programming mode.
-
When the random on/off switch is in the ON position, all lighting effects will now cycle on and off using the average maximum interval you set. The random on/off duration setting is preserved even when power to the LEC is removed.
-
-
-
The LEC is designed to control a large number of lights. In total, the LEC can switch close to 1 amp of current, which equates to 100 Brickstuff Micro Light Boards or 50 Brickstuff Lighting Strips.
-
If you plan to control a large number of lights with the LEC, make sure your power source can supply the required current. If controlling 50 lights or more, you should use one of our maxi power supplies or one of our mains power adapters. If your power source is unable to supply the required current to the LEC, it may behave erratically.
-
-
-
The LEC has four holes (two on the top of the PC Board and two on the bottom) that allow for easy mounting to LEGO studs.
-
You can use four 1x1 round plates or bricks to mount the LEC to any LEGO surface. The LEC takes up a 2x6 area.
-
You can mount multiple LECs side by side.
-
If not mounting into a LEGO creation, you can also use double-sided tape to mount the LEC.
-
When planning your lighting installation, make sure to allow sufficient room for the LEC to be mounted and/or hidden in your installation, while also allowing adequate clearance at the top and bottom of the PC Board for connecting cables and plugs.
-
-
-
If the LEC is not operating as intended, check all connections to make sure plugs are firmly seated.
-
If everything is connected, check to make sure the green power LED on the LEC PC Board is lit. If not, check your power source to make sure batteries are fresh, adapters are connected, etc.
-
If all connectors and power supplies are correct, check the random on/off switch. If it is in the ON (up) position, the lighting effects are likely in the "off" mode because of random operation. Turn the switch back to the OFF (down) position and the lights should come on.
-
If the lights don't come on after all of these steps, try turning the thumbwheel to adjust speed/intensity/brightness.
-
If the lighting effects are behaving erratically (lighting effects appearing to "freeze", etc.), it may be that you have more lights connected than your power supply can support. Try connecting fewer lights, or try using a power supply capable of delivering more current.
-
If all of these steps still do not resolve the issue, please contact us on our website, on the Community tab, to file an issue.
-


Cancel: I did not complete this guide.
7 other people completed this guide.
